Custom Renderer
Dioxus is an incredibly portable framework for UI development. The lessons, knowledge, hooks, and components you acquire over time can always be used for future projects. However, sometimes those projects cannot leverage a supported renderer or you need to implement your own better renderer.
Great news: the design of the renderer is entirely up to you! We provide suggestions and inspiration with the 1st party renderers, but only really require processing Mutations and sending UserEvents.
The specifics:
Implementing the renderer is fairly straightforward. The renderer needs to:
- Handle the stream of edits generated by updates to the virtual DOM
- Register listeners and pass events into the virtual DOM's event system
Essentially, your renderer needs to process edits and generate events to update the VirtualDOM. From there, you'll have everything needed to render the VirtualDOM to the screen.
Internally, Dioxus handles the tree relationship, diffing, memory management, and the event system, leaving as little as possible required for renderers to implement themselves.
For reference, check out the javascript interpreter or tui renderer as a starting point for your custom renderer.
Templates
Dioxus is built around the concept of Templates. Templates describe a UI tree known at compile time with dynamic parts filled at runtime. This is useful internally to make skip diffing static nodes, but it is also useful for the renderer to reuse parts of the UI tree. This can be useful for things like a list of items. Each item could contain some static parts and some dynamic parts. The renderer can use the template to create a static part of the UI once, clone it for each element in the list, and then fill in the dynamic parts.
Mutations
The Mutation type is a serialized enum that represents an operation that should be applied to update the UI. The variants roughly follow this set:
#![allow(unused)]
fn main() {
enum Mutation {
    AppendChildren,
    AssignId,
    CreatePlaceholder,
    CreateTextNode,
    HydrateText,
    LoadTemplate,
    ReplaceWith,
    ReplacePlaceholder,
    InsertAfter,
    InsertBefore,
    SetAttribute,
    SetText,
    NewEventListener,
    RemoveEventListener,
    Remove,
    PushRoot,
}
}
The Dioxus diffing mechanism operates as a stack machine where the LoadTemplate, CreatePlaceholder, and CreateTextNode mutations pushes a new "real" DOM node onto the stack and AppendChildren, InsertAfter, InsertBefore, ReplacePlaceholder, and ReplaceWith all remove nodes from the stack.
Node storage
Dioxus saves and loads elements with IDs. Inside the VirtualDOM, this is just tracked as as a u64.
Whenever a CreateElement edit is generated during diffing, Dioxus increments its node counter and assigns that new element its current NodeCount. The RealDom is responsible for remembering this ID and pushing the correct node when id is used in a mutation. Dioxus reclaims the IDs of elements when removed. To stay in sync with Dioxus you can use a sparse Vec (Vec<Option
An Example
For the sake of understanding, let's consider this example – a very simple UI declaration:
#![allow(unused)]
fn main() {
rsx!( h1 {"count: {x}"} )
}
Building Templates
The above rsx will create a template that contains one static h1 tag and a placeholder for a dynamic text node. The template contains the static parts of the UI, and ids for the dynamic parts along with the paths to access them.
The template will look something like this:
#![allow(unused)]
fn main() {
Template {
    // Some id that is unique for the entire project
    name: "main.rs:1:1:0",
    // The root nodes of the template
    roots: &[
        TemplateNode::Element {
            tag: "h1",
            namespace: None,
            attrs: &[],
            children: &[
                TemplateNode::DynamicText {
                    id: 0
                },
            ],
        }
    ],
    // the path to each of the dynamic nodes
    node_paths: &[
        // the path to dynamic node with a id of 0
        &[
            // on the first root node
            0,
            // the first child of the root node
            0,
        ]
    ],
    // the path to each of the dynamic attributes
    attr_paths: &'a [&'a [u8]],
}
}
For more detailed docs about the struture of templates see the Template api docs
This template will be sent to the renderer in the list of templates supplied with the mutations the first time it is used. Any time the renderer encounters a LoadTemplate mutation after this, it should clone the template and store it in the given id.
For dynamic nodes and dynamic text nodes, a placeholder node should be created and inserted into the UI so that the node can be navigated to later.
In HTML renderers, this template could look like:
<h1>""</h1>
Applying Mutations
After the renderer has created all of the new templates, it can begin to process the mutations.
When the renderer starts, it should contain the Root node on the stack and store the Root node with an id of 0. The Root node is the top-level node of the UI. In HTML, this is the <div id="main"> element.
#![allow(unused)]
fn main() {
instructions: []
stack: [
    RootNode,
]
nodes: [
    RootNode,
]
}
The first mutation is a LoadTemplate mutation. This tells the renderer to load a root from the template with the given id. The renderer will then push the root node of the template onto the stack and store it with an id for later. In this case, the root node is an h1 element.
#![allow(unused)]
fn main() {
instructions: [
    LoadTemplate {
        // the id of the template
        name: "main.rs:1:1:0",
        // the index of the root node in the template
        index: 0,
        // the id to store
        id: ElementId(1),
    }
]
stack: [
    RootNode,
    <h1>""</h1>,
]
nodes: [
    RootNode,
    <h1>""</h1>,
]
}
Next, Dioxus will create the dynamic text node. The diff algorithm decides that this node needs to be created, so Dioxus will generate the Mutation HydrateText. When the renderer receives this instruction, it will navigate to the placeholder text node in the template and replace it with the new text.
#![allow(unused)]
fn main() {
instructions: [
    LoadTemplate {
        name: "main.rs:1:1:0",
        index: 0,
        id: ElementId(1),
    },
    HydrateText {
        // the id to store the text node
        id: ElementId(2),
        // the text to set
        text: "count: 0",
    }
]
stack: [
    RootNode,
    <h1>"count: 0"</h1>,
]
nodes: [
    RootNode,
    <h1>"count: 0"</h1>,
    "count: 0",
]
}
Remember, the h1 node is not attached to anything (it is unmounted) so Dioxus needs to generate an Edit that connects the h1 node to the Root. It depends on the situation, but in this case, we use AppendChildren. This pops the text node off the stack, leaving the Root element as the next element on the stack.
#![allow(unused)]
fn main() {
instructions: [
    LoadTemplate {
        name: "main.rs:1:1:0",
        index: 0,
        id: ElementId(1),
    },
    HydrateText {
        id: ElementId(2),
        text: "count: 0",
    },
    AppendChildren {
        // the id of the parent node
        id: ElementId(0),
        // the number of nodes to pop off the stack and append
        m: 1
    }
]
stack: [
    RootNode,
]
nodes: [
    RootNode,
    <h1>"count: 0"</h1>,
    "count: 0",
]
}
Over time, our stack looked like this:
#![allow(unused)]
fn main() {
[Root]
[Root, <h1>""</h1>]
[Root, <h1>"count: 0"</h1>]
[Root]
}
Conveniently, this approach completely separates the Virtual DOM and the Real DOM. Additionally, these edits are serializable, meaning we can even manage UIs across a network connection. This little stack machine and serialized edits make Dioxus independent of platform specifics.
Dioxus is also really fast. Because Dioxus splits the diff and patch phase, it's able to make all the edits to the RealDOM in a very short amount of time (less than a single frame) making rendering very snappy. It also allows Dioxus to cancel large diffing operations if higher priority work comes in while it's diffing.
This little demo serves to show exactly how a Renderer would need to process an edit stream to build UIs.
Event loop
Like most GUIs, Dioxus relies on an event loop to progress the VirtualDOM. The VirtualDOM itself can produce events as well, so it's important that your custom renderer can handle those too.
The code for the WebSys implementation is straightforward, so we'll add it here to demonstrate how simple an event loop is:
#![allow(unused)]
fn main() {
pub async fn run(&mut self) -> dioxus_core::error::Result<()> {
    // Push the body element onto the WebsysDom's stack machine
    let mut websys_dom = crate::new::WebsysDom::new(prepare_websys_dom());
    websys_dom.stack.push(root_node);

    // Rebuild or hydrate the virtualdom
    let mutations = self.internal_dom.rebuild();
    websys_dom.apply_mutations(mutations);

    // Wait for updates from the real dom and progress the virtual dom
    loop {
        let user_input_future = websys_dom.wait_for_event();
        let internal_event_future = self.internal_dom.wait_for_work();

        match select(user_input_future, internal_event_future).await {
            Either::Left((_, _)) => {
                let mutations = self.internal_dom.work_with_deadline(|| false);
                websys_dom.apply_mutations(mutations);
            },
            Either::Right((event, _)) => websys_dom.handle_event(event),
        }

        // render
    }
}
}
It's important that you decode the real events from your event system into Dioxus' synthetic event system (synthetic meaning abstracted). This simply means matching your event type and creating a Dioxus UserEvent type. Right now, the VirtualEvent system is modeled almost entirely around the HTML spec, but we are interested in slimming it down.
#![allow(unused)]
fn main() {
fn virtual_event_from_websys_event(event: &web_sys::Event) -> VirtualEvent {
    match event.type_().as_str() {
        "keydown" => {
            let event: web_sys::KeyboardEvent = event.clone().dyn_into().unwrap();
            UserEvent::KeyboardEvent(UserEvent {
                scope_id: None,
                priority: EventPriority::Medium,
                name: "keydown",
                // This should be whatever element is focused
                element: Some(ElementId(0)),
                data: Arc::new(KeyboardData{
                    char_code: event.char_code(),
                    key: event.key(),
                    key_code: event.key_code(),
                    alt_key: event.alt_key(),
                    ctrl_key: event.ctrl_key(),
                    meta_key: event.meta_key(),
                    shift_key: event.shift_key(),
                    location: event.location(),
                    repeat: event.repeat(),
                    which: event.which(),
                })
            })
        }
        _ => todo!()
    }
}
}
Custom raw elements
If you need to go as far as relying on custom elements/attributes for your renderer – you totally can. This still enables you to use Dioxus' reactive nature, component system, shared state, and other features, but will ultimately generate different nodes. All attributes and listeners for the HTML and SVG namespace are shuttled through helper structs that essentially compile away. You can drop in your elements any time you want, with little hassle. However, you must be sure your renderer can handle the new namespace.
For more examples and information on how to create custom namespaces, see the dioxus_html crate.
Native Core
If you are creating a renderer in rust, the native-core crate provides some utilities to implement a renderer. It provides an abstraction over Mutations and Templates and contains helpers that can handle the layout, and text editing for you.
The RealDom
The RealDom is a higher-level abstraction over updating the Dom. It updates with Mutations and provides a way to incrementally update the state of nodes based on attributes or other states that change.
Example
Let's build a toy renderer with borders, size, and text color. Before we start let's take a look at an example element we can render:
#![allow(unused)]
fn main() {
cx.render(rsx!{
    div{
        color: "red",
        p{
            border: "1px solid black",
            "hello world"
        }
    }
})
}
In this tree, the color depends on the parent's color. The layout depends on the children's layout, the current text, and the text size. The border depends on only the current node.
In the following diagram arrows represent dataflow:
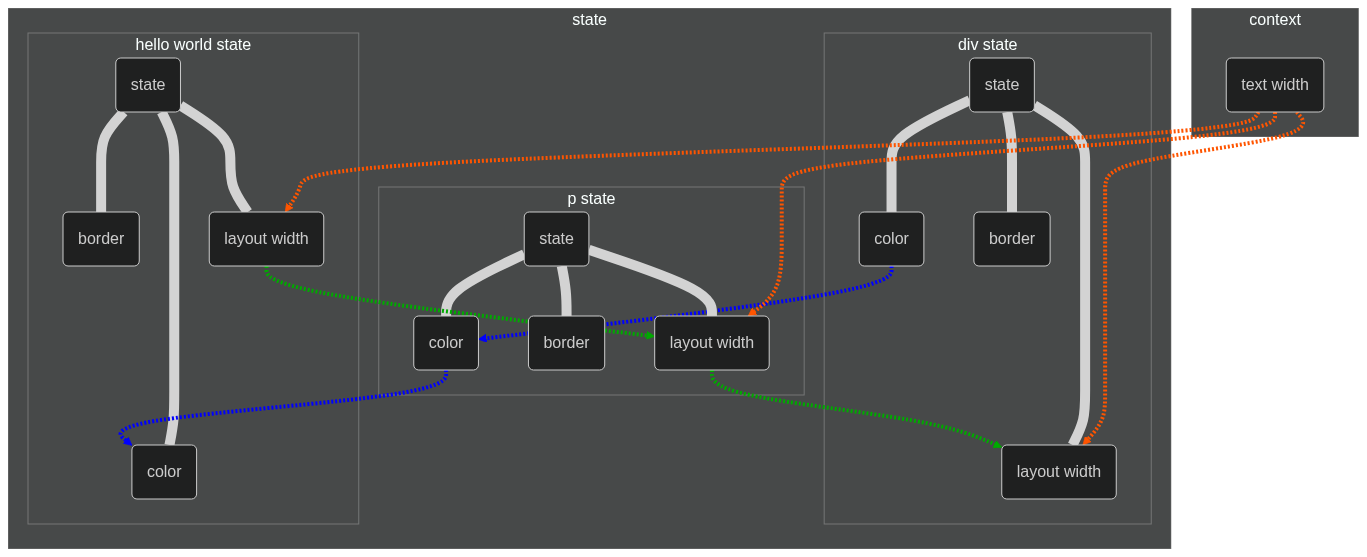
To help in building a Dom, native-core provides four traits: State, ChildDepState, ParentDepState, NodeDepState, and a RealDom struct. The ChildDepState, ParentDepState, and NodeDepState provide a way to describe how some information in a node relates to that of its relatives. By providing how to build a single node from its relations, native-core will derive a way to update the state of all nodes for you with #[derive(State)]. Once you have a state you can provide it as a generic to RealDom. RealDom provides all of the methods to interact and update your new dom.
#![allow(unused)]

fn main() {
use dioxus_native_core::node_ref::*;
use dioxus_native_core::state::{ChildDepState, NodeDepState, ParentDepState, State};
use dioxus_native_core_macro::{sorted_str_slice, State};

#[derive(Default, Copy, Clone)]
struct Size(f64, f64);
// Size only depends on the current node and its children, so it implements ChildDepState
impl ChildDepState for Size {
    // Size accepts a font size context
    type Ctx = f64;
    // Size depends on the Size part of each child
    type DepState = (Self,);
    // Size only cares about the width, height, and text parts of the current node
    const NODE_MASK: NodeMask =
        NodeMask::new_with_attrs(AttributeMask::Static(&sorted_str_slice!([
            "width", "height"
        ])))
        .with_text();
    fn reduce<'a>(
        &mut self,
        node: NodeView,
        children: impl Iterator<Item = (&'a Self,)>,
        ctx: &Self::Ctx,
    ) -> bool
    where
        Self::DepState: 'a,
    {
        let mut width;
        let mut height;
        if let Some(text) = node.text() {
            // if the node has text, use the text to size our object
            width = text.len() as f64 * ctx;
            height = *ctx;
        } else {
            // otherwise, the size is the maximum size of the children
            width = children
                .by_ref()
                .map(|(item,)| item.0)
                .reduce(|accum, item| if accum >= item { accum } else { item })
                .unwrap_or(0.0);

            height = children
                .map(|(item,)| item.1)
                .reduce(|accum, item| if accum >= item { accum } else { item })
                .unwrap_or(0.0);
        }
        // if the node contains a width or height attribute it overrides the other size
        for a in node.attributes().into_iter().flatten() {
            match &*a.attribute.name {
                "width" => width = a.value.as_float().unwrap(),
                "height" => height = a.value.as_float().unwrap(),
                // because Size only depends on the width and height, no other attributes will be passed to the member
                _ => panic!(),
            }
        }
        // to determine what other parts of the dom need to be updated we return a boolean that marks if this member changed
        let changed = (width != self.0) || (height != self.1);
        *self = Self(width, height);
        changed
    }
}

#[derive(Debug, Clone, Copy, PartialEq, Default)]
struct TextColor {
    r: u8,
    g: u8,
    b: u8,
}
// TextColor only depends on the current node and its parent, so it implements ParentDepState
impl ParentDepState for TextColor {
    type Ctx = ();
    // TextColor depends on the TextColor part of the parent
    type DepState = (Self,);
    // TextColor only cares about the color attribute of the current node
    const NODE_MASK: NodeMask = NodeMask::new_with_attrs(AttributeMask::Static(&["color"]));
    fn reduce(&mut self, node: NodeView, parent: Option<(&Self,)>, _ctx: &Self::Ctx) -> bool {
        // TextColor only depends on the color tag, so getting the first tag is equivilent to looking through all tags
        let new = match node
            .attributes()
            .and_then(|attrs| attrs.next())
            .map(|attr| attr.attribute.name.as_str())
        {
            // if there is a color tag, translate it
            Some("red") => TextColor { r: 255, g: 0, b: 0 },
            Some("green") => TextColor { r: 0, g: 255, b: 0 },
            Some("blue") => TextColor { r: 0, g: 0, b: 255 },
            Some(_) => panic!("unknown color"),
            // otherwise check if the node has a parent and inherit that color
            None => match parent {
                Some((parent,)) => *parent,
                None => Self::default(),
            },
        };
        // check if the member has changed
        let changed = new != *self;
        *self = new;
        changed
    }
}

#[derive(Debug, Clone, PartialEq, Default)]
struct Border(bool);
// TextColor only depends on the current node, so it implements NodeDepState
impl NodeDepState for Border {
    type Ctx = ();
    type DepState = ();

    // Border does not depended on any other member in the current node
    const NODE_MASK: NodeMask = NodeMask::new_with_attrs(AttributeMask::Static(&["border"]));
    fn reduce(&mut self, node: NodeView, _sibling: (), _ctx: &Self::Ctx) -> bool {
        // check if the node contians a border attribute
        let new = Self(
            node.attributes()
                .and_then(|attrs| attrs.next().map(|a| a.attribute.name == "border"))
                .is_some(),
        );
        // check if the member has changed
        let changed = new != *self;
        *self = new;
        changed
    }
}

// State provides a derive macro, but anotations on the members are needed in the form #[dep_type(dep_member, CtxType)]
#[derive(State, Default, Clone)]
struct ToyState {
    // the color member of it's parent and no context
    #[parent_dep_state(color)]
    color: TextColor,
    // depends on the node, and no context
    #[node_dep_state()]
    border: Border,
    // depends on the layout_width member of children and f32 context (for text size)
    #[child_dep_state(size, f32)]
    size: Size,
}
}
Now that we have our state, we can put it to use in our dom. We can update the dom with update_state to update the structure of the dom (adding, removing, and changing properties of nodes) and then apply_mutations to update the ToyState for each of the nodes that changed.
fn main(){
    fn app(cx: Scope) -> Element {
        cx.render(rsx!{
            div{
                color: "red",
                "hello world"
            }
        })
    }
    let vdom = VirtualDom::new(app);
    let rdom: RealDom<ToyState> = RealDom::new();

    let mutations = dom.rebuild();
    // update the structure of the real_dom tree
    let to_update = rdom.apply_mutations(vec![mutations]);
    let mut ctx = AnyMap::new();
    // set the font size to 3.3
    ctx.insert(3.3f64);
    // update the ToyState for nodes in the real_dom tree
    let _to_rerender = rdom.update_state(&dom, to_update, ctx).unwrap();

    // we need to run the vdom in a async runtime
    tokio::runtime::Builder::new_current_thread()
        .enable_all()
        .build()?
        .block_on(async {
            loop{
                let wait = vdom.wait_for_work();
                let mutations = vdom.work_with_deadline(|| false);
                let to_update = rdom.apply_mutations(mutations);
                let mut ctx = AnyMap::new();
                ctx.insert(3.3f64);
                let _to_rerender = rdom.update_state(vdom, to_update, ctx).unwrap();

                // render...
            }
        })
}
Layout
For most platforms, the layout of the Elements will stay the same. The layout_attributes module provides a way to apply HTML attributes a Taffy layout style.
Text Editing
To make it easier to implement text editing in rust renderers, native-core also contains a renderer-agnostic cursor system. The cursor can handle text editing, selection, and movement with common keyboard shortcuts integrated.
#![allow(unused)]
fn main() {
let mut cursor = Cursor::default();
let mut text = String::new();

let keyboard_data = dioxus_html::KeyboardData::new(
    dioxus_html::input_data::keyboard_types::Key::ArrowRight,
    dioxus_html::input_data::keyboard_types::Code::ArrowRight,
    dioxus_html::input_data::keyboard_types::Location::Standard,
    false,
    Modifiers::empty(),
);
// handle keyboard input with a max text length of 10
cursor.handle_input(&keyboard_data, &mut text, 10);

// mannually select text between characters 0-5 on the first line (this could be from dragging with a mouse)
cursor.start = Pos::new(0, 0);
cursor.end = Some(Pos::new(5, 0));

// delete the selected text and move the cursor to the start of the selection
cursor.delete_selection(&mut text);
}
Conclusion
That should be it! You should have nearly all the knowledge required on how to implement your renderer. We're super interested in seeing Dioxus apps brought to custom desktop renderers, mobile renderers, video game UI, and even augmented reality! If you're interested in contributing to any of these projects, don't be afraid to reach out or join the community.