Project Setup
Fullstack Dioxus apps are structured a bit differently than client-only apps. This distinction has implications on how we organize our apps, requiring more care when adding dependencies and including code.
In this chapter, we'll explore how to use feature flags and cargo targets to structure our apps for fullstack development.
Dioxus provides a number of templates with
dx newto automatically bootstrap new fullstack projects.If you want to get started quickly, we suggest using one of the built-in templates and then heading on to next chapter.
The Server/Client split
A "fullstack" application is actually composed of at least two distinct binaries:
- The client binary that runs the web, desktop, or mobile application
- The server binary that renders the initial HTML and runs server functions
Because our client app and server app target different platforms, we need to include different code and different dependencies. You can conceptualize the "server" as just another platform for your app, just like you might target both iOS and Android. The server will have different dependencies than the client app, and thus you need to properly configure your app's Cargo.toml and build flags.
How DX builds your app
Our build tool, DX, is capable of building both the client and server of your app simultaneously. If the --hotpatch flag is enabled, DX will also automatically hot-reload both the client and server code in tandem.
When developing your app, you'll generally use dx serve. This command accepts the usual arguments you might pass to cargo run:
# We can customize the build's features, profile, or release mode
dx serve --features "spicy" --release

# We can specify examples, packages, and binaries
dx serve --example dogs
Under the hood, DX automatically detects if the target app has a server variant by checking its Cargo.toml for a Cargo feature called "server". In this Cargo feature, you would enable the server feature on Dioxus:
[features]
server = ["dioxus/server"]
DX will also look for specific client features ( "web" / "desktop" / "mobile") and enable the relevant feature depending on the target platform. DX uses the concept of "platform" to distinguish types of builds from one another.
To set a build's platform, you can use --web, --desktop, --ios, etc. When you specify a platform, DX also enables a corresponding feature in your Cargo.toml:
# enabled with `--web`
web = ["dioxus/web"]

# enabled with `--desktop`
desktop = ["dioxus/desktop"]

# enabled with `--mobile`
mobile = ["dioxus/mobile"]
Running the command might look like:
# sets target=wasm32-unknown-unknown, features="web", profile="wasm-dev"
dx serve --web

# sets target=host, features="desktop", profile="desktop-dev"
dx serve --desktop

# sets target=aarch64-apple-ios-sim, features="mobile", profile="ios-dev"
dx serve --ios
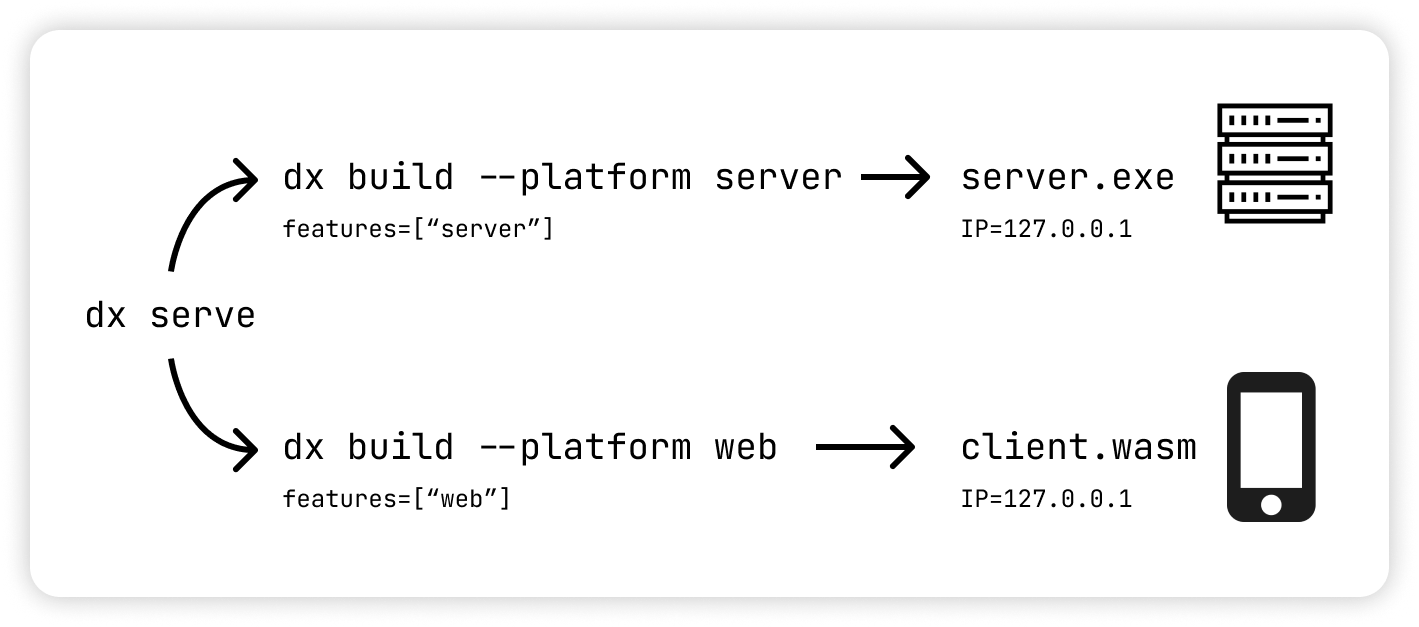
If your dioxus dependency enables the fullstack feature, DX recognizes this app is a fullstack app and then creates two builds, each with a separate platform:
[dependencies]
dioxus = { version = "0.7", features = ["fullstack"] }

[features]
web = ["dioxus/web"]
server = ["dioxus/server"]
Internally, DX splits your input command into two separate cargo build commands, each with a different platform.
Feature flags like these for the client and server are automatically generated by the CLI when you run dx new with fullstack enabled. If you are creating a project from scratch, you will need to add the feature flags manually.
If you are not familiar with features in rust, you can read more about feature flags in the cargo reference.
Customizing the Builds
A fullstack app is comprised of two separate binaries, so DX provides a way to customize each. Usually, the default dx serve command is sufficient, but for complex app setups that need per-target customization, you can use the @client and @server modifiers to pass target-specific cargo args to each:
dx serve \
  @client --ios --features "optimizations" \
  @server --bin server
This syntax makes it possible to have two separate entrypoints for our app. This can be extremely useful if you have an existing backend and would like to launch that alongside your Dioxus frontend.
By default, DX isolates your server and client builds by levaraging Cargo Profiles. Cargo profiles let us specify certain build modifiers like opt-level, debug symbols, LTO, and other optimizations.
DX will use these profiles
web-dev/web-release: targeting the web with--webserver-dev/server-release: targeting the server (implicitly, or with--server)desktop-dev/desktop-release: targeting desktop apps with--desktopios-dev/ios-release: targeting iOS apps with--iosandroid-dev/android-release: targeting Android apps with--android
These profiles correspond 1:1 with the "platforms" DX supports. Note that a platform is just a way of DX to isolate two builds from each other. You can completely customize the build, including:
--renderer: swap between the various 1st-party renderers (ie--renderer native)--bundle: the bundle format of the build (.app,.apk,.ipa, etc.)- all cargo options (
--features,--target,--profile,--bin, etc.)
Adding Server Only Dependencies
Many dependencies like tokio cannot be compiled to WebAssembly, and thus should only be built for the server. If these dependencies are enabled when building a WASM bundle, you will receive cryptic compilation errors. As such, we need to take care not to accidentally add server-only dependencies to our client app.
For example, if we want to interact with the filesystem in a server function, we might want to add tokio. The tokio crate provides utilities for working with async IO with abstractions like tokio::fs::File. Unfortunately, if try to add tokio with its full feature set, we will receive a compilation error:
[dependencies]
# ...
# ❌ If tokio is added as a required dependency, it will be included in both the server
# and the web bundle. The web bundle will fail to build because tokio is not
# compatible with wasm
tokio = { version = "1", features = ["full"] }
error[E0432]: unresolved import `crate::sys::IoSourceState`
  --> /Users/user/.cargo/registry/src/index.crates.io-6f17d22bba15001f/mio-1.0.2/src   |source.rs:14:5
14 | use crate::sys::IoSourceState;
   |     ^^^^^^^^^^^^^^^^^^^^^^^^^ no `IoSourceState` in `sys`
...
Since we added tokio as a dependency for both the server and the client binary, cargo tries to compile it for each target. This fails because tokio is not compatible with the wasm32-unknown-unknown target.
To fix the issue, we can make the dependency optional and only enable it in the server feature:
[dependencies]
# ...
# ✅ Since the tokio dependency is optional, it is not included in client bundle.
tokio = { version = "1", features = ["full"], optional = true }

[features]
# ...
# ✅ Since the tokio dependency is enabled in the server feature, it is included in
# the server binary.
server = ["dioxus/server", "dep:tokio"]
Now when we build with dx serve, the project compiles successfully!
Adding Client Only Dependencies
Many dependencies like wasm-bindgen and web-sys are only compatible with the client. Unlike server-only dependencies, these dependencies can compile on native targets, but they will panic when used outside of the browser.
You can reduce build times for your server and native binaries by including web dependencies only in the browser client binary.
Instead of adding web only dependencies to every binary in your project like this:
[dependencies]
# ...
# ❌ If web-sys is added as a required dependency, it will be included in the server,
# native, and the web bundle which makes build times longer.
web-sys = { version = "0.3.60", features = ["console"] }
You can make the dependency optional and only enable it in the web feature in your Cargo.toml:
[dependencies]
# ...
# ✅ Since the web-sys dependency is optional, it is not included in the server and
# native bundles.
web-sys = { version = "0.3.60", features = ["console"], optional = true }

[features]
# ...
# ✅ Since the web-sys dependency is enabled in the web feature, it is included in
# the web bundle.
web = ["dioxus/web", "dep:web-sys"]
Managing Binary Specific Imports
Once you have set up binary specific dependencies, you need to adjust any of your imports to only import the dependencies when building for the binary that includes those dependencies.
For example, if tokio is only enabled in the server feature, you will need to import it like this:
// Since the tokio dependency is only enabled in the server feature,
// we need to only import it when the server feature is enabled.
#[cfg(feature = "server")]
use {tokio::fs::File, tokio::io::AsyncReadExt};
You also need to only compile any usage of the dependency when the feature is enabled:
// Since the tokio dependency is only enabled in the server feature,
// we need to only compile any usage of the dependency when the server feature is enabled.
#[cfg(feature = "server")]
async fn read_file() -> Result<String, std::io::Error> {
    let mut file = File::open("path/to/file").await?;
    let mut contents = String::new();
    file.read_to_string(&mut contents).await?;
    Ok(contents)
}

// The bodies of server functions automatically only compile when the server feature is enabled.
#[server]
async fn get_file_contents() -> Result<String> {
    let mut file = File::open("path/to/file").await?;
    let mut contents = String::new();
    file.read_to_string(&mut contents).await?;
    Ok(contents)
}
It may be more convenient to group server or client specific code into a module that is only compiled when the feature is enabled:
// Instead of configuring each item that is only used in the server, you can group
// them into a module that is only compiled when the server feature is enabled.
#[cfg(feature = "server")]
mod tokio_utilities {
    use std::path::PathBuf;
    use tokio::fs::File;
    use tokio::io::AsyncReadExt;

    pub async fn read_file(path: PathBuf) -> Result<String, std::io::Error> {
        let mut file = File::open(path).await?;
        let mut contents = String::new();
        file.read_to_string(&mut contents).await?;
        Ok(contents)
    }
}

// Then you can define your server functions using shared utilities you defined for
// server only code.
#[server]
async fn get_file_contents() -> Result<String> {
    let file = tokio_utilities::read_file(PathBuf::from("path/to/file")).await?;
    Ok(file)
}

#[server]
async fn get_other_file_contents() -> Result<String> {
    let file = tokio_utilities::read_file(PathBuf::from("path/to/other/file")).await?;
    Ok(file)
}
The rust reference has more information about conditional compilation in rust.
Separate Frontend and Backend Crates
If you so choose, you can split your frontend and backend into separate crates. This can be useful for larger projects where you have separate complex entrypoints for web, desktop, and mobile.
Workspace setups bring extra complexity, but they can make it much easier to share data types and functions across several different projects. For instance, you might have a single API crate used by several different apps.
In these cases, we might organize our workspace like so:
├── Cargo.toml
└── packages/
    ├── cat-app/
    │     ...
    ├── dog-app/
    │     ...
    └── pet-api/
          ...
If you're using Dioxus Fullstack, you can import your pet-api's server functions to call from your UI. In the client app, you can then import the pet-api crate:
[dependencies]
pet-api = { workspace = true }
To launch the server, you can choose one of two options:
- Start the pet-api server from the client project
- Launch the pet-api crate's main binary
If your server is simple enough, then option 1 can be a decent option since it automatically integrates with dx serve.
However, if you choose to have a dedicated server binary, then you'll need to use the @client and @server modifiers to use a different binary:
dx serve @client --bin dog-app @server --bin pet-api
The built-in "Workspace" Dioxus Template can serve as a good starting point for workspace setups.